I recently realized that I don't need to title my blogs. I'm happy for I don't like titles much.
My roommate Chris and I have been watching True Blood lately and I'm starting to find vampires a little hot. Ok, really hot. Especially Eric Northman, yowza. Yeah, yeah, I've fallen for 2009's vamp craze. So what? At least I'm not reading Twilight. Gaawwwd.
For Halloween I wanted to be Pam from True Blood and I didn't want to spend too much money on the costume, so I decided I'd make the corset myself. Corsets can be pretty costly (upwards of $60) and being that I don't go around wearing corsets on the daily, this wouldn't be the best way to spend my money. I found this amazing website by Kimberley Pope that gives step-by-step instructions (complete with photos, yay!) of how to take measurements of your body, draw the pattern pieces, and assemble the whole thing. The only time I found it challenging was when my stubborn self came out and I tried following my own directions. Fail. Then I'd re-read her clear directions and it would all make sense. Win.
I headed to Fabric Outlet at 2109 Mission St @ 17th St next to Thrift Town for the supplies. This was my shopping list:
•black vinyl (outer corset)
•red satin (lining)
•boning (structure)
•busk (connect front of corset)
•ribbon (lacing)
•eyelets (structure for lacing holes)
•black bias tape (smooth edging)
•black thread for heavy materials
•dot paper (drawing pattern pieces)
I went into the store without an idea of how much fabric I needed, partly because I hadn't taken my measurements yet and partly because this is the first piece of clothing that I've actually made from scratch. Way to be prepared Ally, way to be prepared. Luckily the staff at Fabric Outlet are very helpful and able to answer pretty much any sewing-related question you throw at them. I ended up spending close to $60 on this whole project, but the experience making my own pattern and garment was well worth it. This is what I have to show for some 20 hours of work:

Kimberley's website provides this printable outline to mark out your measurements. One of the best sewing tutorials I've seen.

Beginning of pattern drafting. Drawing the basic outline.

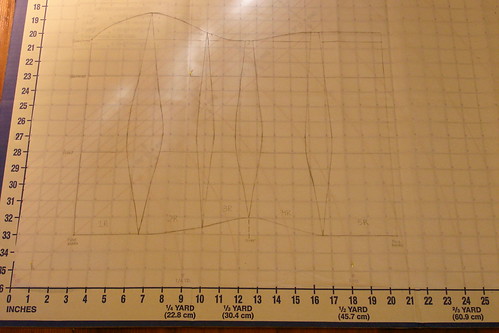
Second step of pattern drafting. Measuring out the pieces (deducting for waist cinching/form-fitting). I'll eventually learn the correct terms. Just wait.

Pattern pieces refined and labeled. Ready to cut!

It's difficult to see the pieces cut out as I put them back on the same shiny fabric for some reason, but - fabric pieces are cut! My first fabric pieces from a pattern, ever. Preeeetty proud.

Red satin fabric pieces sewn together to make lining. Pinned on my dress form to make sure it was properly constructed. Success, so far. Black thing's a mustache. Alright.

This is the finished corset I wore on Halloween. After sewing the lining together, I got rather engrossed in my work and rushed for time, thus the lack of photos between lining and finished product.

Back of corset. Not sure what's going on in this photo.

Boobz.
The most difficult part of this project was sewing the vinyl to the lining for the boning slots. It turns out the lining wasn't long enough to meet the end of the outer part of the corset and the stitching isn't exactly straight. All in all, it turned out well though. It's fully functional, the boning didn't tear any skin, and it looks hot if I do say so myself. Hoping I'll have more opportunities to wear it in the future.
My roommate Chris and I have been watching True Blood lately and I'm starting to find vampires a little hot. Ok, really hot. Especially Eric Northman, yowza. Yeah, yeah, I've fallen for 2009's vamp craze. So what? At least I'm not reading Twilight. Gaawwwd.
For Halloween I wanted to be Pam from True Blood and I didn't want to spend too much money on the costume, so I decided I'd make the corset myself. Corsets can be pretty costly (upwards of $60) and being that I don't go around wearing corsets on the daily, this wouldn't be the best way to spend my money. I found this amazing website by Kimberley Pope that gives step-by-step instructions (complete with photos, yay!) of how to take measurements of your body, draw the pattern pieces, and assemble the whole thing. The only time I found it challenging was when my stubborn self came out and I tried following my own directions. Fail. Then I'd re-read her clear directions and it would all make sense. Win.
I headed to Fabric Outlet at 2109 Mission St @ 17th St next to Thrift Town for the supplies. This was my shopping list:
•black vinyl (outer corset)
•red satin (lining)
•boning (structure)
•busk (connect front of corset)
•ribbon (lacing)
•eyelets (structure for lacing holes)
•black bias tape (smooth edging)
•black thread for heavy materials
•dot paper (drawing pattern pieces)
I went into the store without an idea of how much fabric I needed, partly because I hadn't taken my measurements yet and partly because this is the first piece of clothing that I've actually made from scratch. Way to be prepared Ally, way to be prepared. Luckily the staff at Fabric Outlet are very helpful and able to answer pretty much any sewing-related question you throw at them. I ended up spending close to $60 on this whole project, but the experience making my own pattern and garment was well worth it. This is what I have to show for some 20 hours of work:

Kimberley's website provides this printable outline to mark out your measurements. One of the best sewing tutorials I've seen.

Beginning of pattern drafting. Drawing the basic outline.

Second step of pattern drafting. Measuring out the pieces (deducting for waist cinching/form-fitting). I'll eventually learn the correct terms. Just wait.

Pattern pieces refined and labeled. Ready to cut!

It's difficult to see the pieces cut out as I put them back on the same shiny fabric for some reason, but - fabric pieces are cut! My first fabric pieces from a pattern, ever. Preeeetty proud.

Red satin fabric pieces sewn together to make lining. Pinned on my dress form to make sure it was properly constructed. Success, so far. Black thing's a mustache. Alright.

This is the finished corset I wore on Halloween. After sewing the lining together, I got rather engrossed in my work and rushed for time, thus the lack of photos between lining and finished product.

Back of corset. Not sure what's going on in this photo.

Boobz.
The most difficult part of this project was sewing the vinyl to the lining for the boning slots. It turns out the lining wasn't long enough to meet the end of the outer part of the corset and the stitching isn't exactly straight. All in all, it turned out well though. It's fully functional, the boning didn't tear any skin, and it looks hot if I do say so myself. Hoping I'll have more opportunities to wear it in the future.


No comments:
Post a Comment